Making Compost
Time for making compost! You’ve selected your compost location and structure, and now its time to for make your compost. This process is more like feeding a slow burning camp fire... you just keep placing enough wood (organic matter) on the fire to keep it from burning out.
Also, creating compost is like raising children, everyone has their own opinions and will tell you how do it. But as you know, raising children is about the love, time, and attention that really matters. Over time, you'll discover what works best for you.
An Easy Approach to Making Compost
My approach is simplicity. As long as you understand a few fundamentals (see Compost Requirements), it’s very hard to screw it up. And even if you don’t get it right…soils are very forgiving, as long as you focus on long-term soil health.
I recommend keeping a laid-back approach to making compost, because it involves no turning, no special decomposition additives, and low labor input. Again, keep it simple and fun. The laid-back approach is collecting and building your compost as the organic matter becomes available. The laid-back approach usually takes a year to decompose (like a fine wine), and next year’s compost is the compost you’re creating this year. IT’S EASY!
Note: Just because I recommend the laid-back approach, doesn’t mean that you can’t get a lot more sophisticated and methodical. I just don’t have a lot of time, and this works for me. Do-Learn-Experiment and you’ll discover what works for you.
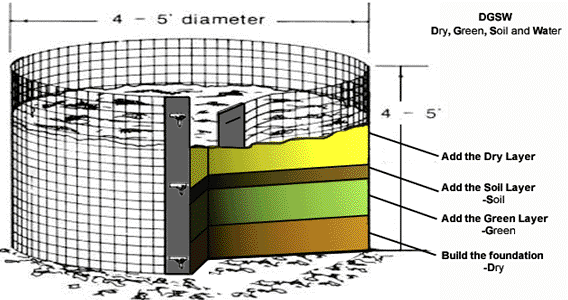
The laid-back making compost approach is called DGSW. DGSW stands for Dry, Green, Soil and Water. That’s it! That is all you need to remember. Understanding DSGW and applying it will allow you to create quality compost that rivals any compost made by the Masters (which I’m not).

Five Steps to Laid-Back DGSW Compost Making
- Build the foundation.
This is a one-time step done at the initial phase of making compost. You do this once and forget about it.
Take a shovel or garden fork and loosen the soil base of your compost pile down about eight inches (21 cm). Once the soil is loose, water the area, but do not saturate it. Then lay four to six inches (11 cm -15 cm) of rough organic material.
Examples of rough organic material are:
- Twigs and small branches
- Large dry weeds
- Vegetative stalks
- Palm branches
- Sunflower stalks, etc.
Think of this initial layer as that organic matter that you would normally use a chipper or shredding machine to break down, but instead you’re letting the composting process do it for you. Very Cool!
- Add the Green layer.
The green layer is organic material that is high in nitrogen. This layer is also the Kitchen waste (wet) material that will decompose quickly. You can even mix in (added cost) nitrogen based organic fertilizer (to help speed up the decomposition) to really get it cooking. The thickness of this layer is not that big of a deal and is usually dependent on what you have available. As a rule, don’t go thicker than six inches (15 cm).
Examples of organic material used in the green layer are:
- Fruit and vegetable scraps
- Grass cuttings
- Plant material
- Rabbit, pigeon, cow and horse manure
- Soft prunings
- Tree and shrub clippings
- Vegetable plant remains
- Weeds
- Add the Soil layer.
ALWAYS add the soil layer after the green layer. The importance of the soil layer is not to add bulk, rather it’s to eliminate decomposition odor and add microorganism from your native soil to your compost. Add just enough soil to cover the green layer.
It’s important that you use your native garden soil, as it is readily available and contains its very own soil DNA that you’re improving and utilizing.
I usually take a five-gallon (18 liters) bucket full of soil for this layer from the garden. You may even want to set a side a larger container with soil so that as you add small amounts of kitchen waste you can take a small garden trowel and cover the waste as you go.
Just remember do not leave the green layer exposed.
- Water the new layer.
Much like a newly planted bed of seedlings this layer needs to be watered, but do not saturate it. You must treat your compost at this point like a living dynamic organism that will bring benefits to your garden beyond all your expectations. It’s truly remarkable what you have at this point.
- Add the Dry layer.
The dry layer is much like step one, except the organic material is much less bulky. This layer can be four to six inches (11 cm -15 cm) thick.
Examples of organic material used in the dry layer are:
- Cardboard
- Coffee grounds
- Egg shells
- Fall leaves
- Old straw & hay
- Paper based Egg boxes
- Paper towels & bags
- Rodent bedding
- Sawdust
- Tea bags
- Tree Leaves
- Wood ash
- Wood shavings
- Woody prunings
Repeat steps Two through Five
On an ongoing basis and as organic material becomes available from your yard and garden, repeat steps 2-5.
It’s important that your compost stays moist not dry – keep it moist but not saturated. It’s best to think of keeping it as moist as a wrung-out sponge.
Return to the Top of Making Compost


Comments
Have your say about what you just read! Leave me a comment in the box below.